We spent several weeks gently removing trim around the windows and doors as well as pulling baseboard. Finding a 10” wide board 15’ long is a real pleasure. Improvements that have happened over time included placing big registers and outlets in the baseboard. We’ll be doing some patching, another reason this clear white pine will end up being stripped clean and then painted. But let’s not get ahead of ourselves for we’ve some fun discoveries to share.
In removing the baseboards in the family and dining rooms we had a challenge as at some time a second layer of wood floor, nice 2” wide clear oak was added on top of the original 3” pine. This meant gently prying out the top and then using the electric crow bar, a.k.a. sawzall, to clip the nails and out it popped. Bill Williams was a great help with this, as was his father Cam who at 94 years young was happily pulling nails.
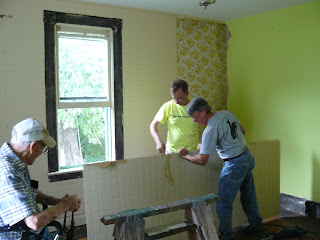
Bill and Cam lent a hand with taking down the trim and
removing anything not in the final plans. We wondered what we
would find behind the brick patterned masonite board!--crumbling plaster?
No, just wall paper. The dark boarder around the window is not trim--
it’s soot on the plaster where the trim has been removed. They must have
burned coal to heat this house.
Cam employed impressive skills to remove nails from reusable boards.
One of the early things we noticed was that it appeared the central stairs had been turned around 180°. It seems that the front door was originally in the corner of the L where a bathroom was added. We’re guessing that as the town grew out to the house it made sense to move the front door to the west side of the house where a porch was added. Another hint that the front door was in the corner can be found in the flooring and in a closet door that had the only transom window trim in the house.
We’ve gently removed closets and walls that were added when the house was made into a two unit (upstairs, downstairs) rental. Were were able to pull out a wall that created a shotgun bathroom. We really don’t know what we are gong to do with the fireplace, which seems to have been most recently used with a coal and/or gas insert before being sealed off. We’re thinking gas logs and have begun looking for an old mantle.
Bill helped remove the closet in the corner of what will be our living room.
Here is an after shot with the closet removed. You can see the layers of
paint and wall paper and the opening to the chimney. When we removed
the wall-to-wall carpet in this room, it revealed the original pine
floor boards which had been stained around the edges of the room--
no need to stain where the area rug would cover!
Under the wall-to-wall carpet in the attic over the kitchen, we found
this linoleum type flooring. Thankfully it was not glued to the pine floor boards
beneath and could be easily removed. The same is true for the upstairs
apartment kitchen which had vinyl adhesive squares instead of
carpeting over the very old floating linoleum.
We removed the wall that was added to make the upstairs
galley bathroom. This will allow for a larger bedroom
which will be Chris’ studio.
This bathroom will loose the bath tub and be redesigned
as a half bath—sink and toilet.
Thanks for reading,
Bob
NEXT TIME: Photos of plaster and lath demolition! If you care to join us, we’re having parties on Saturdays October 6 and 13. Bring a hammer and perhaps goggles. We’ll provide dust masks and lunch.


No comments:
Post a Comment