Thursday, August 22, 2013

A New Perspective


Hi all,

Here’s our first blog since occupying “our old house.” Yes, last week on Friday the movers came and loaded up all our furniture and heavy stuff, moving it from our rental home of almost two years on Pine Run Road to our home on Charles Street. We spent that night on the air mattress. The next day friends arrived to help us move the smaller stuff and lots of boxes. 

Just before moving, good friend Bill Williams did us a great favor by taking photos of all the rooms of our new home with his digital camera and super, super wide angle lens. We thought you would enjoy seeing these. These photos are great as you can see three sides of the room at once. Keep in mind the wide angle makes the rooms look really large and stretched out. The windows are actually very tall and somewhat narrow. Click on the photos to see a large image.

Kitchen from the dining room—crown molding still to be added.

Dining room looking toward the stairs—waiting for paint and the railing to be installed.

Living room looking toward front door and stairs from the other side of landing. 
Mantle and fireplace surround are another project to be completed.

Family room looking toward hall behind the stairs.

The master bedroom. Bathroom is behind the pocket door.

ChrisAnn's studio on the second floor. Closet is awaiting trim.

Guest room will be getting a built in dresser and book shelf on left. 
Door on the far left leads to the “attic.”

A favorite room. We call it the attic, but it is really
on the second floor above the kitchen wing.

Post move, there is work yet to be completed. 

On the inside: crown molding on the kitchen cabinets, installation of microwave (on back order) and dishwasher (came damaged), some trim on the closet doors, final coat of paint on the trim in many rooms, the final coat of wall paint on the dining room, halls, living room, family room, guest room, closets and master bath, final details in all the baths (lights, mirrors, wainscot, etc.), rods and lights in the closets, the living room mantle and most importantly the railing on the central stairs (actually made moving easier without it).

On the outside: front porch railings and ceiling, back deck railing, shutters. Then we will regrade and rework the three lane wide driveway into one before digging into a new landscape design. We’ll keep you posted.

A special thanks to our friends who came out to help us move: Alan and Carla A., Bill W., Gary S., Wayne and Peggy R., and Dennis H. You guys are the best!

Until next time,
ChrisAnn

Wednesday, June 26, 2013

Putting Things Back


Hello all!

A slight lull in a flurry of project activity is the opportune time to update the blog. I’m doing laundry and letting the paint brush rest as we wait for more trim to be milled. Since our last post much has been accomplished. The dry wall specialists finally arrived in May (a bit late) and after three weeks the walls were hung and mudded and ready for primer. We forgot to take photos of the dry wall. As we indicated, our neighbor Joe sprayed all the walls and ceilings and then did a final coat on the ceilings. That meant all the windows and stairs had to be covered with plastic and the floors covered with resin paper. All the electrical outlets, switches and light boxes had to be stuffed with paper to prevent the paint from obliterating the electricians careful notes. Then Joe went to work—it only took him two days. That saved us a lot of time and provided a smoother finish than we could ever have gotten by rolling. Bob got right to work painting the walls.

The master bedroom with primed walls and finished ceiling.

While the dry wall was being hung and Bob was painting the walls, I was working daily on painting the inside trim that was being made by Mars Lumber. Mars Lumber is doing an amazing job of replicating our existing trim. We couldn’t be happier. As they finish a batch, I start painting it as quickly as possible to keep up with our trim carpenter who started working on June 6. Thankfully all the original trim already painted and reading to go, but there seems to be just as much new trim to prepare—new doors and windows and rooms that didn’t have the original trim add up. 

We prepare the trim with a coat of primer followed by a coat of finish paint. A final coat of paint will be done after the trim is installed. We’re about ready for that as trim carpenter, Dave Collins has been busy trimming out doorways and windows and hanging doors. Dave is doing an amazing job of putting everything back and adding in the new trim as needed.

Trim carpenter, Dave Collins, at work.

The doors have not been refinished yet, but needed to be 
hung so everything fits just right.

We had to have all new plinths made (aren’t they pretty?) as we removed 
about five different profiles from the house. Most were pretty beat up anyway. 
Too many hits with the vacuum cleaners over the years!

Here’s the newly trimmed window in the kitchen nook and first coat of wall paint. 

In order for Dave to frame the doors, we had a lot of hardware to clean up and some to purchase. We were able to find antique hardware for sale online—even designs that match our existing steeple hinges. We discovered that the best way to remove built up paint from our cast iron hardware is to gently boil it in an old pan on the stove. The heat softens and loosens the paint which can then be scraped away. A few visits back in the pan did the trick. We will eventually repaint the cast iron to look like oil rubbed bronze which is pretty close to how they would have looked. Dark hardware was popular in the Victorian era.

Look what all that paint was hiding. 

We’ve also been looking for additional antique doors to match the originals. This has proved to be a challenge. Thankfully Dave is patient and will frame those doorways once we find the needed doors. We have a lead on some doors through Craig’s List and are hoping it will pan out. In the meantime Dave will begin building the railing system on the stairs. We can’t wait to see how that all comes together!

In addition to all of that, we’ve spent quite a few hours in our attic—the little room above the kitchen. We replaced all the bead board that we had taken down in order to insulate the walls and ceiling. Then I spent many hours washing it all down as it got very dirty. The backs of the boards were covered in soot indicating that there must have been a chimney on the end wall and maybe a coal stove in this room. Simply Green worked well at getting off the grime. Then we gave it a good priming. Bob filled in the cracks and gaps with caulk and we are in the process of painting it. It will be the same color as the trim throughout the house. 

Here is all the bead board back in place, but before it got washed down. 
The dark patches are places where it hadn’t been painted (closet walls). 
So not everything got put back just as it was.

We had hoped that our kitchen floor would be installed by now, but that got moved forward to July 3. It will take the tiler about three weeks to install the tile floors and the tile in the tub and shower. As soon as the kitchen, entryway and laundry are tiled, Masterpiece will begin installing the kitchen cabinets. The delay has been a disappointment but it should allow us to get most of the painting finished before we move in. We have to paint the insides of the windows, too. So we have plenty more painting to do (I’m on my second brush). Oh, and the flooring specialist is scheduled to start working on July 22. He’ll be installing new oak in the living room and upper hall and refinishing the rest of the floors—oak downstairs, pine upstairs.

In our last post we indicated that we’d be moving in June. Shortly after that we took a good look at the calendar and realized that that would not be happening. So we were shooting for July 26. Now we are looking at August 16.

We’re getting there. We are most anxious to be in our new home—we’d appreciate your prayers for patience and strength for the weeks ahead. Hope you enjoyed reading about the latest adventures. 

Fondly,
ChrisAnn (and Bob)


Monday, April 29, 2013

Siding is Exciting


Time to check in to fill you in on what’s been happening to our old house. We’ve had our hands full keeping the subcontractors lined-up in this phase of the renovation. But as the cold winter months have slowly allowed spring’s arrival, much interior work has been completed and much to our delight, the siding is going up right now. What do you think? Is it looking like we imagined in the planning drawing above?


The north side of the house with shutters still to come.

Larry installs a final piece of siding on the front of the house.

In March, after all the inside framing was completed and the new windows installed in the attic, Plumber Steve arrived and went to work. Pretty much all the water and waste lines were replaced and new ones added for the master bath, half bath and laundry room. Keith and Larry installed the exterior trim around the windows and doors and then disappeared to another job for a few weeks. 

With the plumbing rough-in work complete, the insulation specialists arrived to work their magic. They sprayed a one inch layer of foam insulation on the inside of all the exterior walls. The heating and air conditioner workers then could step in to begin reworking the ductwork throughout the house. This took quite a bit of time and proved challenging for an old house that’s been added onto over the years. Thankfully, Dean, the electrician, got to work, too, with his workers rewiring the entire house. Out with the old and in with the new—plenty of outlets and switches in all the right places. About that time, Keith and Larry returned and started installing siding to the exterior.

The spray foam application is part one of the insulation package

After the required inspections for the newly constructed addition to the house, the insulation guys returned and added the fiberglass batting over the foam applied earlier, but not before I thoroughly picked up all the scraps and vacuumed up all the sawdust including that which was hiding in the wall cavities. All that made everything look neat and tidy and ready for dry wall. We took a photographic inventory of all the walls as a location record of every duct, pipe and wire for future reference.

The batting is part two of the “flash and batt” system of insulating.

Before the batting was added, we took lots of photographs 
to document the location of 
ducts, pipes and wires—thus the signs.

Wires, wires everywhere...

The attic is fully insulated now. We will reinstall the 
beaded board to the walls and ceiling in this room.

While all that was going on, Bob and I picked out the lighting fixtures for all the rooms (only two more to decide on). We’ll have ceiling fans with lights in all the rooms except the dining room, baths, entry and laundry room. All the pieces for the kitchen have been selected and ordered. Just a shower door for the master bath and a mirror/medicine cabinet for the half bath are yet to be decided upon.

As the dry wall is being installed, Bob and I are hard at work getting the inside trim primed and painted. In addition to shopping we’ve spent many hours getting the salvaged trim ready for painting. We filled nail holes, bumps and imperfections with wood putty and sanded, then filled and sanded again. We’ll have additional windows and doors so Mars Lumber has our order for additional door and window casing, bull’s eyes, plinth blocks, and window sills and aprons. They had to make new cutting heads for all of the patterns except the window aprons! We’re waiting on placing the base board order as we want to install what we have first. It will be like a puzzle as so much has changed in the room configurations.
The detached garage of our 
rental house is our painting workshop. 
Thanks, Hamilton’s, for the concrete floor!


Priming the bull’s eye trim.

Of course before the trim goes up, we’ll have to paint the walls. We purchased all the wall paint—Sherwin Williams was having a 40% off all paint sale! We brought home a boat load of paint. Really, it filled the back of our Outback. I was glad we had all the paint colors picked when that sale was announced. We have hired neighbor Joe, who is a professional handyman and painter, to spray the primer on all the dry wall and the finish coat on the ceilings.

That’s about it for now. Maybe we’ll have time to check back in when the dry wall is installed. I know we’ll be busy, but the end is insight. Oh, you’re probably wondering—move in date is hopefully in June. 

ChrisAnn for both of us

Wednesday, February 20, 2013

Moving Right Along


We are feeling a bit tardy with getting another entry written in our old house saga as the winter begins to yield its icy grip here in western pa. We’ve had plenty of cold and the guys are very happy to be inside most all of the time, even though there is minimal heat in the house. We’re trying to avoid making too large a contribution to global warming before the house is fully insulated.

Too cold and snowy to  work on the exterior!

When we left off last they were about to start installing the windows and that has been done successfully, save for three little windows in the attic for which we await some new sashes. The small roofs got their new shingles, the siding (scallops) is up in the gables and is looking good with the dessert sand trim package. The guys have painted the exterior window trim in preparation for installation, but as the weather turned really cold they moved inside.

Windows and doors all installed except for the attic windows above the kitchen.

 We are delighted to have windows that will actually operate and not pour pounds of paint particulates onto their sills. Some windows moved a bit to provide better locations but most went back in the same holes to preserve the look of the house. We removed the double front doors and placed an octagon window at the landing at the bottom of the staircase. The new front door went into the living room window spot. What a different feel the front porch will have, entry on the left and an enlarged seating area to the right.

Redesigned front porch waiting for some posts--adding one to make five.

Much time has been spent on meeting with the good folks at Masterpiece Kitchens where Debbie holds fort as designer and Pete does the installs. Long discussions and multiple visits to various shops led to selecting a slab of granite for the countertops, confirming cabinet measurements, adjusting multitudes of details so that framing could be completed. We are almost ready to hit the order button on the kitchen. The floor and backsplash tile are selected. If I ventured that we are almost done with decisions there I’d be as far off as my first guestimate on cost. At least we’ll have a happy banker friend when we’re all done.

Shopping for the granite countertop proved a challenge, 
but we eventually decided on this one—Renoir.


Kitchen components—granite, cabinet doors, floor and 
backsplash (will be subway) tile.

While we’ve been shopping the guys have been reframing some interior walls, building closets and shoring up some floor joists that had lost way too much material to a mad remodeler trying to put in a bathroom drain pipe. A couple of jack posts in the basement pushed up a sag in the dining room floor beside the stairwell. Looking at the structure of this old house is amazing in so many ways. It really has hung together magnificently for 100 plus years. I’m confident with the changes and improvements we are on track for keeping this old place in good shape for many more. Today the new stairs were installed, and all I can say is, “Wow!” It makes me real eager to see the finished product begin to reveal itself.

This second floor plan shows our changes.
Closets are being added to the studio, master bedroom, 2nd bedroom and attic.
We finally figured out how to fit in a small half bath, too.


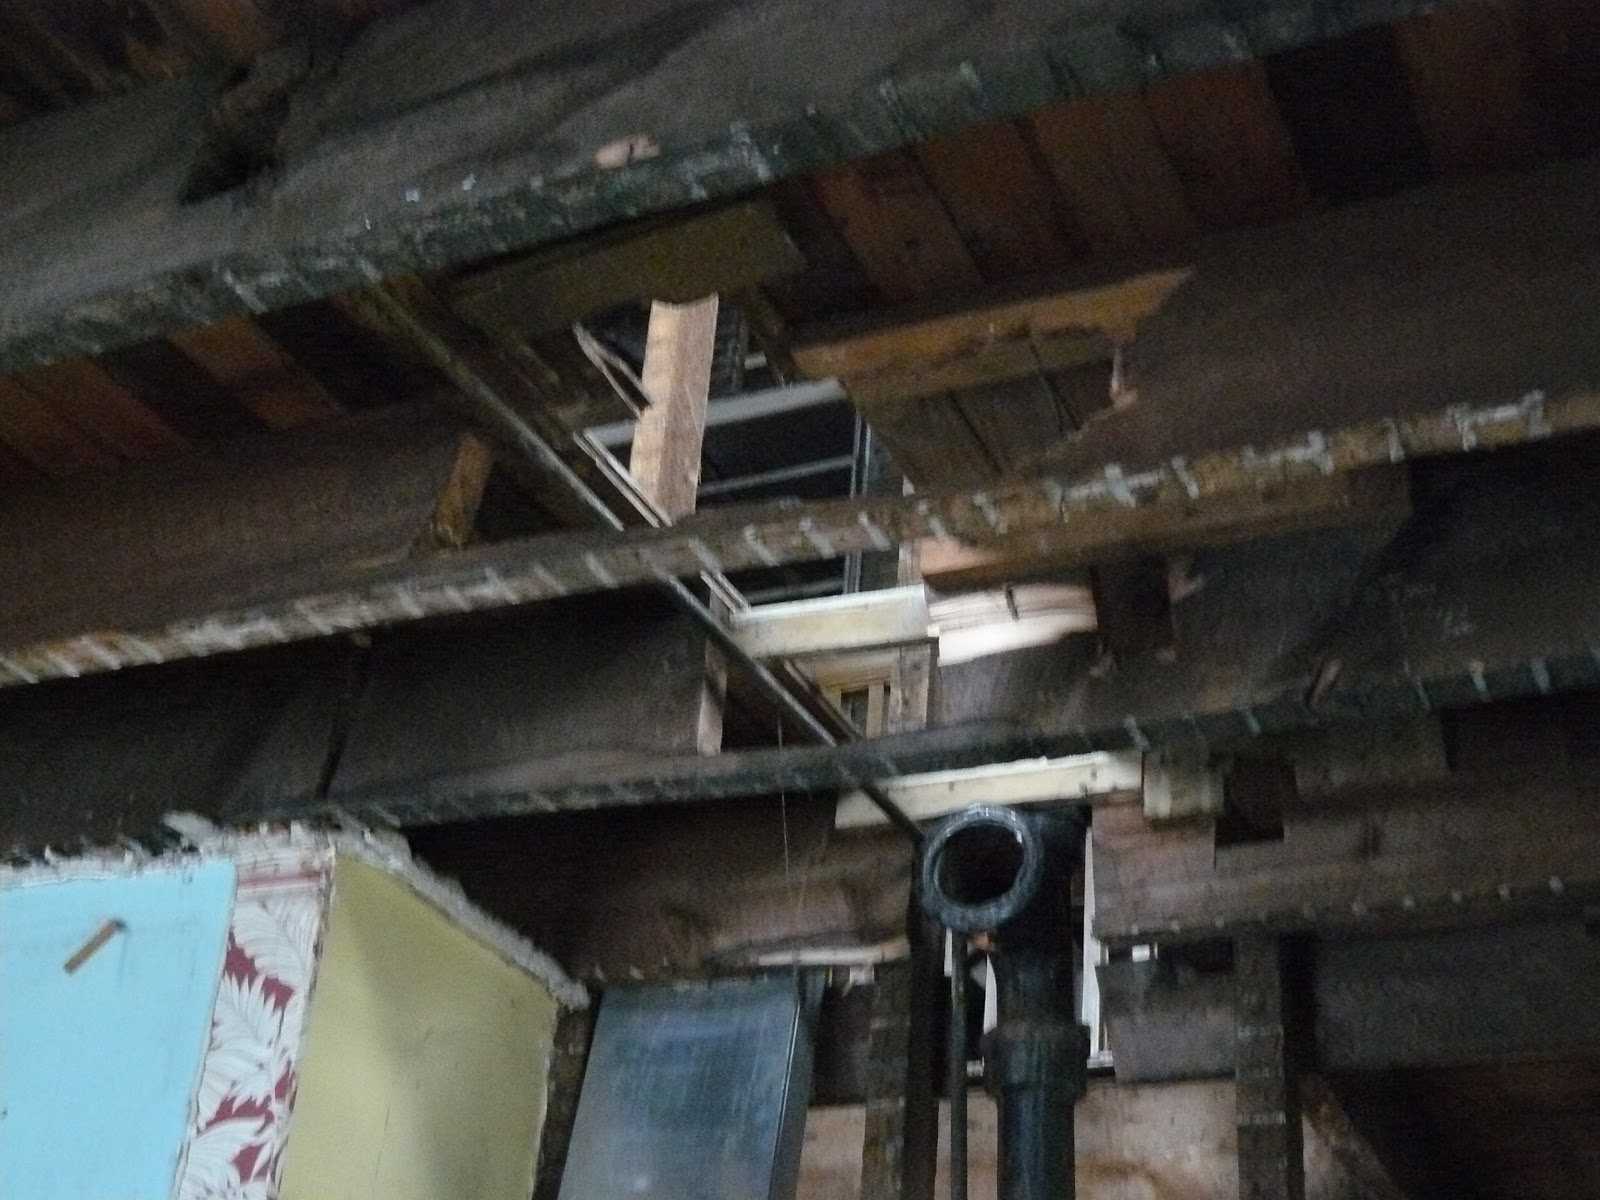
No, we don't have termites. These holes were made in the living room rafters 
when a previous owner added the upstairs bathroom. Pretty scary! 


But Keith and Larry got them all patched up.

I’ve taken on one small project, but it’s going to be my little baby. After consulting with the insulation pros and selecting a flash and batt system for the walls, we decided to remove all the beaded board in the attic. I hope to put it all back, but first we redesigned the closet area and hall space between the guest bedroom and attic and I’m going to do a built-in dresser and bookshelf (see second floor plan above). Lots of fun, and a bit of a challenge, too. (That’s code for it’s taking longer than I thought it would.) Oh, flash and batt means they will apply an inch spray foam in the wall cavities and then fill the remainder with fiberglass batts. This should seal up all the air leaks in the walls real nice.

The beaded board in the attic had to all come down, but we'll put it back.

Hope you enjoy this update and when we pop in again we can show a little of the green siding and some interior finish work including the stairs. Have a blessed Lenten season and a Joyous Easter.

peace, bob

Tuesday, January 8, 2013

Something New


Hello again and happy new year! 

It is time to let you know what has been happening on our “new” old house. We’re excited because yesterday the new windows were delivered and the contractors will start to install them this week. They have been busy so that means the new addition is built and under roof—in fact all of the roof is finished. The soffit, fascia and gutters are in place, too.


New shingles being install on the existing roof.

The addition which is in the location of the old sun porch will house a laundry room and a mudroom kind of entryway on the first floor. The second floor will house the master bathroom. Also we are adding a small bump out on the kitchen wall. This is where our breakfast nook will be built. Here are some drawings to help illustrate the changes.


This drawing shows the laundry room and entryway. There will be 
doors from the entryway into the kitchen and the family room (to the left). 
The kitchen nook will have two side-by-side double hung windows.


The master bath will be housed in the second floor of the addition.


Pouring the foundation for the addition.


Framing the first floor of the addition and the kitchen bump out.


The roof being built over the new construction.


We also have a new set of exterior steps to the basement. The old ones were in the wrong place and in poor condition so we had a precast concrete set complete with metal doors put in. That meant digging a large hole and cutting a doorway into the stone foundation. They have amazing saws to do that kind of thing now—very cool.


Bob and Zady inspecting where the doorway
will be cut through the old foundation.


This unit was installed in one piece.


The guys have also been working on the front porch—pouring new footers and constructing a new floor—the roof will stay minus the old shingles.


The old porch floor had to go. The house looks strange 
all wrapped in Tyvek—windows and all.


We had a bit of a mix up on our window order, but it was caught in time and has been remedied. Also two rain storms filled our basement with water. Having an open foundation and no gutters contributed to the problem. Hopefully there will be no more shop vacuuming the basement. Thanks to Denny for lending the sump pump which we used to empty the shop vac canister. 

It feels good to get past the holidays as our plates were full trying to stay up to speed with the house and participate in the usual Advent and Christmas activities. We’re starting to feel like we’re keeping far enough ahead of the contractors that we can go at a more relaxed pace. Still, every day we are working on some component of the house, but we are enjoying the adventure most days.

Once the windows are installed, the siding and trim will be installed on the exterior. We can’t wait to post pictures of that—we are very excited about the colors. We’ll have that in our next installment. It is fun sharing our progress. Let us know if you are reading our blog.

Until later,
ChrisAnn