Thursday, March 16, 2017

Down in the Basement and Outside in the Yard

Greetings "Our Old House" Friends,
Basement flooding happened once during the construction phase of our old house and once later on. An inordinate amount of rain and the water rose through the floor, which is simply bricks on dirt. Both times we spent hours bucketing and sloping out water to save the furnace and whatever else was in the basement. Thus in March of 2016, we began the work to install an interior french drain and, temporarily, a sump pump in the corner. The plan is to dig a ditch from the back of the house to the bank, which slopes away to Swampoodle. Then gravity, instead of the sump pump, can take care of any excess water and we’ll never have another sleepless night. So that meant digging and renting a jack hammer to work our way around the outside of the basement area that is beneath the dining room and family room. This area is dug out lower than the glorified crawl space under the living room, which may also need similar treatment. 

Jack hammering the bedrock shale. 
At least this corner of the house is built on solid rock!

A true test of the slope of the ditch. A couple more inches of water 
and the sump pump will kick on!

The old terra cotta drain pipe, that went into the yard, has clogged.
Now we need a new one deeper in the ground.

Along the way we discovered that we were getting some water from the terra cotta sewer pipe–this is really not good. We were also getting ground water coming in alongside the pipe as water follows the easiest path. In this case it was right into our basement. Here’s one time it was good to have bricks laid without mortar on a dirt floor. We were able to replace the terra cotta with schedule 40 PVC waste line to the edge of the foundation. 

Goodbye old terra cotta.

New PVC waste lines.

Then things got interesting. Do we dig up the front yard? Or can we reline the existing terra cotta? We were lucky that the camera inspection showed only some minor root balls and no break downs of the pipe. We had a crew come in and install a fiberglass liner, working from in the basement, without any disturbance to the yard or that new sidewalk we’d just put in. Worth every penny!!

We called in the professionals.

Curing the fiberglass lining. 

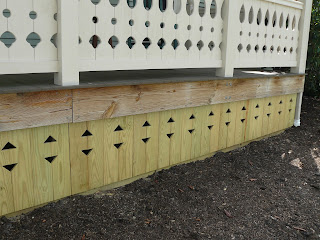
Summer projects included building trellises that went between the property line fence posts we’d kept when we sold the white plastic fencing. Again ChrisAnn designs something that is just a little bit out of the ordinary, picking up on a theme in the octagon front window and a pattern you may see in the skirting we put under the porch and deck. The trellises are made from treated furring strips and the skirting is a simple pattern on the edge of 1” treated lumber.


The trellises run along the the south edge of our yard.

Front porch skirting.

The view of the skirting from under the porch.

In the summer Pastor Alex visited from Malawi, Africa. He was very interested in ChrisAnn’s garden. We built compost bins to enable us to recycle yard, garden and some kitchen waste without having it blow around the neighborhood. When the neighbors asked what we were up to now, ChrisAnn’s stock response became, “Those are our sheep pens!” Laugh not, now someone in downtown Harmony is keeping llamas! What she really wants is a donkey. Hee Haw!

Visiting with Pastor Alex. The compost bins are to the right.


Bob, for both of us

Monday, March 6, 2017

Too Much Time Gone By…

Hello blog watchers,

Entirely too much time has gone by since we last posted something here– a couple of years in fact. Alas, ChrisAnn has picked photos and asked me to fill in the story so we’ll see how her prompting my forgettery works out. 
Ahh, the front walk. When Ed and his crew reworked the driveway and installed the parking pad they excavated and stoned the area where we planned the new front walk. We had made another friend, Randy, during a project at Crestview in which he helped design and pour a beautiful set of steps. He’s been doing concrete work for longer than I’ve been pastoring and loves a good challenge. So when I asked if he’d like to help us do a stamped front walk he was eager to jump on board, with pay of course.  

We selected a die color and rented a set of stamps to emulate a cobblestone walkway. The powdered die went into the premix truck and got a good stir before we filled the form, floated and troweled  the mud and then hopped to with the stamp set. This process began with a thorough dusting of parting compound and then pounding the flexible stamps into the wet concrete at just the right time. Once we got into the rhythm of things it went pretty easily. 

The next day we power washed it off and then finished up with a coat of sealer that really made the subtle colors and the pattern pop. I’ve done my share of concrete work, but was very happy to be the flunky on this whole project.

Randy trowels the concrete, bringing the cream to the top.
(Click on photos to enlarge for better viewing.)

 
After laying the stamps on the wet mud, 
we pounded them down with a tamping tool (not shown). 
We rotated the six stamps as we went to vary the pattern repeat. 

A cobblestone front walk!

We’ve toted home tons of Pennsylvania sandstone over the years. Then the fun begins, laying the rocks out, studying their shapes, setting aside the ones that will be capstones, picking the biggest ones for the base and slowly putting it all together. Which ones have the prized edges and which ones are just plain rubble, best used for backfill? Yes, it’s a big puzzle, a bit of a headache and sometimes a real pain in the back. However, over the years I’ve learned a few tricks to moving those beasties and now my favorite tools are a couple of digging bars and a heavy duty two wheel dolly we originally bought for hauling firewood. And then there’s the six inch angle grinder with a diamond tipped blade!

Like doing the edges of a puzzle first, 
I start with the corners and then work across. 
Chris’ kitchen garden is full of herbs, lettuce and some late beans.

Sometimes the old adage, ‘measure twice and cut once,’ really does work out in the carpenter’s favor. When it came to the front steps, Randy and I had calculated and recalculated the rise and run of the stairs several times before we settled on the final placement of the sidewalk. Having the base in the right place and the math all done made it a fairly easy project to build the front steps. We’d hung the old ones up temporarily a couple years ago when the porch was built so we’d have access, but since they had been in the center of the porch and the ground sloped away, we eventually had to start again. Here we chose a traditional porch step with the stringers notched and recessed beneath the treads.

Turn around and parking pad to the right,
 with some grass killed off for a future flower bed.

With the stringers installed, riser and tread installation goes easily.

One of the reasons we did not put a railing on the front porch or back deck when we originally began restoration work was that we didn’t know what we wanted. We knew we did not want a modern deck look. We also were not drawn to turned spindles. We hoped to have a front porch that was a delight to sit on and read a book or chat with friends as well as attractive from the street view and complimentary to the folk victorian style of our home. So, ChrisAnn went to work. The real work of this project was countless hours spent in the studio. When there is a good plan, execution becomes secondary, although in this case it was not simple. 

While the rock work was going on, we ordered supplies from our friends at Mars Lumber. We picked a top rail profile that they built and milled out of cypress. To that we added some special rectangular stock for the bottom rail and a big stack of 1x8’s for the flat sawn balusters. You’ll see from the pictures that the wood shop became a little factory during the Fall. Jigs made the process go pretty smoothly but it took a some more calculating to find the sweet spot in widths with a variety of distances between posts. 

Rough cutting the balusters with a jig saw.

Getting them all the same went easily with a jig, a router and a tracer bit.

Softening the edge with a 45° chamfer bit.

Stacks and stacks of balusters.

Our little garage/shop got rather congested.

When there was a 4x4 inside the post, the hanging was simple. 
When the center of the post was a pipe it was another story. 
Not wanting to use visible hanging brackets,
 I managed to pre-drill holes to catch the 3” stainless screws.

Sealing out the rain and snow.


In the end we were very pleased with the final result, even though there were days when I thought it might never end. Thanks to a few vacation days and some late warm weather we got one coat of stain on before the cold really set in. Now it was time to clean up the shop and put things to rest for Thanksgiving and Christmas of 2015 were just around the corner. 

Early one Fall morning, deck at back door.

It’s a beautiful November day–
a.k.a.will this project never end?


We plan to blog again very soon with 2016's adventures. We'll see how that plan goes!  

Bob, for both of us

Wednesday, September 30, 2015

The Best Made Plans (for Doors) and Other Adventures

Hello blog watchers,

No, we’re not done adding to this means of recording progress and life that goes on while fixing up “this old house.” So, if you are so inclined, read on. I will try to make a quick, yet clear description of what’s happened since our last post in August of last year.

I reported then that we hoped to remove all the paint from the interior doors and get them freshly painted and installed last fall. Well, out of twelve doors we got TWO finished. Yes, only two. We now know that it takes about 15 person hours to refinish just one door. So in the spring we recruited some help. Our friend Sharon S. took on the task of stripping the paint from the remaining doors in her free time. Sharon stripped paint, Bob filled and sanded and I painted. We exchanged sets of doors in twos and threes.

Bob has undergone an in-depth study of the inner workings of Victorian doorknobs and latches. God bless his patience! So after being throughly cleaned and repainted they are being reinstalled to do what they were designed to do over a hundred years ago. 

On the inside of a door knob...

A doorknob in working order!

Currently we have five doors in complete working order; five that just need doorknob hardware installed; and the remaining three that might be ready for paint this week. 

But last fall we did get the wheels in motion to begin our landscaping improvements. First task at hand was changing the driveway. Though a three car wide driveway was handy during the construction, we prefer using the space for other things like yard and gardens. 

A drawing of our plans for hardscaping and landscaping. 
Click on images to enlarge.

We plan to enlarge the existing garage to allow space for a walk through door on the north side, workshop space for Bob and attic storage. The 20’ x 22’ garage only has room for two cars and not much more. (Right now it is full of everything but cars!) 

Between the house and the garage we are envisioning a three level patio and walkway to the side entrance. We’ve completed work on a kitchen garden close to the side entrance to make it easy to cut herbs, onions and other veggies for meal preparation and a parking pad to serve as a space for guest parking with access to the front door and for turning around when exiting the garage. 

We’ve also narrowed down the driveway at the street end to one car width to make room for a vegetable garden along the edge of the property. That side and the front of the house get the most sun. The backyard is small and shady a good portion of the day. Bob put to use his wall building skills to create retaining walls along the driveway and parking pad. Thank you to Kathy B. for giving us the field stones she no longer wanted to use for retaining walls. We spent three days taking apart flower beds and carting home rocks of all sizes. We had some help, too. Our utility trailer (once a 1978 pop up trailer) gave up the ghost in the process, however. So sad! One too many loads of firewood, rocks and mulch over the years.

We began the project by bringing in the big machines to move things around. Our neighbor to the south wanted to extend his driveway, so we did a swap. We traded his top soil for our extra gravel. Ed R. and his crew got to it with a track hoe and skid steer.

Leveling off the ground for the kitchen garden.
The foundation shrubs were pulled out.
The pile of rocks were used to create retaining walls 
along the driveway and parking pad.

The parking pad goes on this side of the kitchen garden.
The ground level needed to be raised as
our yard has a gentle slope from side to side.

We removed the white vinyl privacy fence that ran between the properties.
We’ll use some of the posts to create trellises instead.

We used a long rope to layout the new edges
of the driveway before spray painting the lines.

Ed and his crew went about removing the gravel and
putting it where it was needed before removing the soil and
putting it where it was needed. Amazing!

Here Ed removed sod with the skid steer so we can
create a foundation for the new sidewalk.

Then winter settled in and painting and yard work was done for the year. Bob built the planned bookcase in the wall of the guest room. After recovering from neck surgery in January, I worked on designs for sawn balusters for the porch and deck railings. As spring made its return we planted trees in the front yard and laid out the gardens. Bob built fun gates for each! No more stepping over the fence.

We decided on red maples for the front yard. We’ll eventually have to
take down the “not so healthy” sugar maple—but we’ll wait as long as we can!
More trees to come later.

Bob excavates the holes. I wasn’t allowed to help
because of healing from my surgery.

I planted herbs, spinach, greens and lettuce in the kitchen garden

Grass is taking hold around the just planted vegetable garden.
I started the tomato plants from seeds inside in March.
Hadn’t done that in a long time.

We laid an underground pipe to drain the front downspouts.
Bob begins to lay out the stones in preparation for wall building.

Bob built this temporary patio with the slate that had been
the front sidewalk out to the street. Eventually we will use it for
the sidewalk between the house and kitchen garden.

Bob in the midst of major puzzle building. The two long rectangular stones are
the steps down to the sidewalk. They were part of the old basement stairs.

We hope to soon post another blog installment so you can see the work that followed this past summer. Until then, enjoy the autumn season.

ChrisAnn (for both of us)

P.S.--I’ve decided that Bob and I are beavers. We like to build things. And like beavers who respond to the sound of flowing water by building and repairing, when we see something that needs fixing we go to work. Hope this helps you understand a bit.


Thursday, August 14, 2014

Almost a Year!

Hey there!

You haven’t heard from us for a while, but we’re still here—in our old house. So it is about time we post something just to keep this thing going. No, moving in did not signal the end of the work. Though since the last blog installment, we can say most of the things I listed in the previous one (those things yet to do) are mostly done. In my naivety I think I thought we’d get them done last fall. HA HA.

Here’s a few photos to summarize (click on image to enlarge):

Most of the rooms needed their final coat of wall paint.
This photo of Bob rolling the upper hall is taken from the living room.


Bob lends Dave the trim carpenter a hand with
installing the stair railing in the upper hall.


Bob built wooden components in all the closets.
We thought it would be in keeping with the house’s charm.
This is the double closet in the master bedroom.


This is another shot of the master bedroom closets.
We had the challenge of working around the chimney at the back.
Adjustable shelves go in the box-like features.


The front yard maple was one of the first to turn—autumn is upon us.


We installed the beaded board (wainscot) on the walls of the 
master bath—no more hired help around. 
Here Bob is installing the baseboard.


Bob built the mirror after we couldn’t find anything we liked.
We bought all the moldings and got creative.


I stopped to take a photo while priming the stairs. It took longer 
to apply all the blue masking tape than to do the actual painting!


Rolling, rolling, rolling...last room on first floor, the family room.


Sadly these two old spruces in the front yard were dying.
We had them taken down before the winter winds blew them down.
This photo was taken from the upper hall window.


Then toward the end of October, I crashed. All the mental and physical stress of the previous three years took their toll. My thyroid went berserk and my world came to a screeching halt. Honestly we were both exhausted and after some serious soul searching decided that in order to get back to a healthy place we would put the tools away—stop all work on the house. That may sound simple, but it wasn’t. It was extremely hard to turn off the motor which had been in high gear in order to keep up with deadlines and make the house ready for occupancy. We’d achieved that much—so yes, we could take a break! And we did so from November through February.


Nature takes a rest, so we do, too.


The snow is piling up in this shot from the street toward the garage. 
We were happy to shovel a short and level driveway for 
the first time in many, many winters.


My godparents hosted our winter escape to Florida in 
February—a much needed rejuvenating time away.
Thank you, Uncle Lee and Aunt Shirley!


As spring approached we made a few purchases to furnish the family room. It’s becoming a comfy place to relax and watch TV. Then it was apparent spring cleaning (more like spring re-organizing) was greatly needed. Selling the original washer and dryer opened up enough space in the basement to inspire us to build some shelves so we could unpack boxes and get stuff up off the floor. Bob spent days unpacking his workshop and making spaces to hang and store yard and work tools in the garage. What a relief to be able to find things--no more digging through boxes. Being able to walk through these spaces was a welcome change, too.


The rhododendrons put on a vibrant display in May.

As the weather continued to warm we resumed what was left of the interior painting—the guest room walls and trim in various rooms. This was placed high on the priority list as we did NOT want to look back in five years and still not have everything painted. We’re amazed at the hours we’ve had to spend with paint brush in hand.

Currently we are beginning the long process of stripping and repainting all the doors—all twelve of them. We’re taking them down by twos—stripping, sanding, and painting before rehanging them. The door hardware also needs to be stripped and painted as well—hinges, door knobs, latches, knob plates, key plates, latch plates, and all the screws. I never realized how many pieces of hardware there are on old victorian doors.

After that, not far down the “to do” list is finishing the front porch and putting up the shutters.

In the meantime we are giving serious thought and planning to our outdoor living spaces. But we will leave that for another installment. And it probably is time to post some before and after photos. Stay tuned or stop by and see things in real life. 

It feels good to be back. Thanks for reading,

ChrisAnn